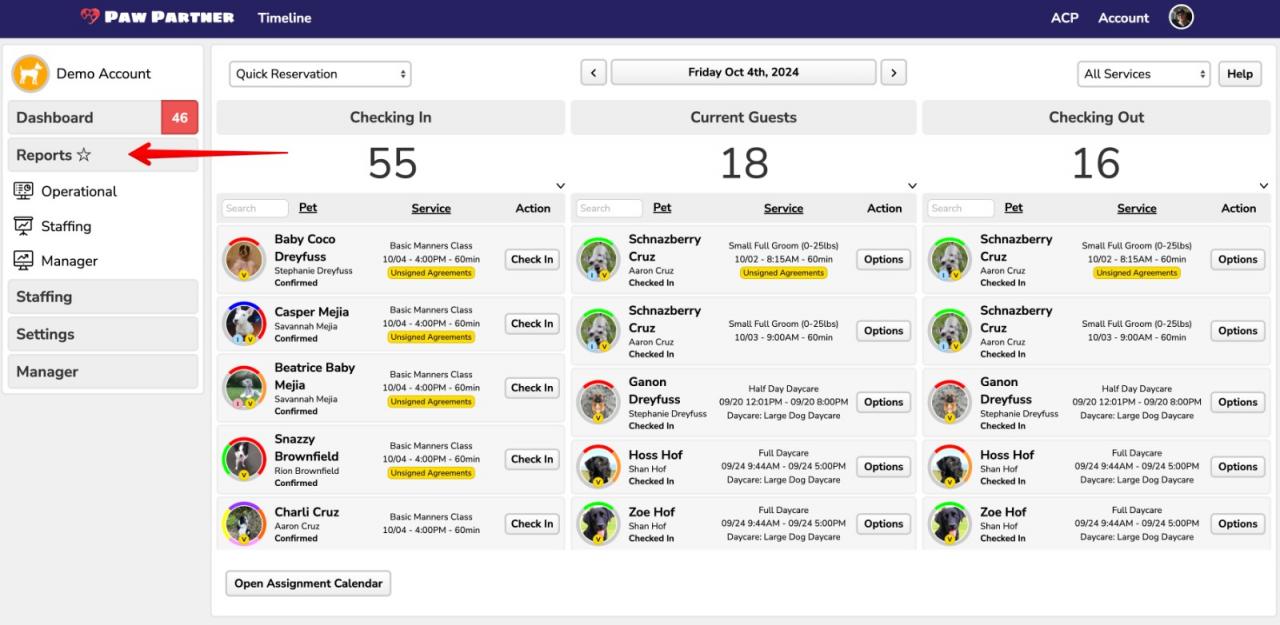
We have long been working on getting our reports all in one area so you don't have to hunt down different reports in 3 different areas within Paw Partner. You will see a new "Reports" section in the left hand menu where all reports will live. This gives us the ability to make all of the reports permissible or restricted to each of your staff based on how you want to set up the staff profile.
The new Reports section is broken up into three areas: Operational, Staffing, and Manager.
The Operational section will be the area that helps run all of your daily operations. Think Feeding, Medical, Stay, Vaccination reports etc.
The Staffing reports area houses the three core Staffing reports: Tip, Commission, and Staff Hours Reports.
The Manager reports will be where you want to go to see all of your financial and forecasting reports.
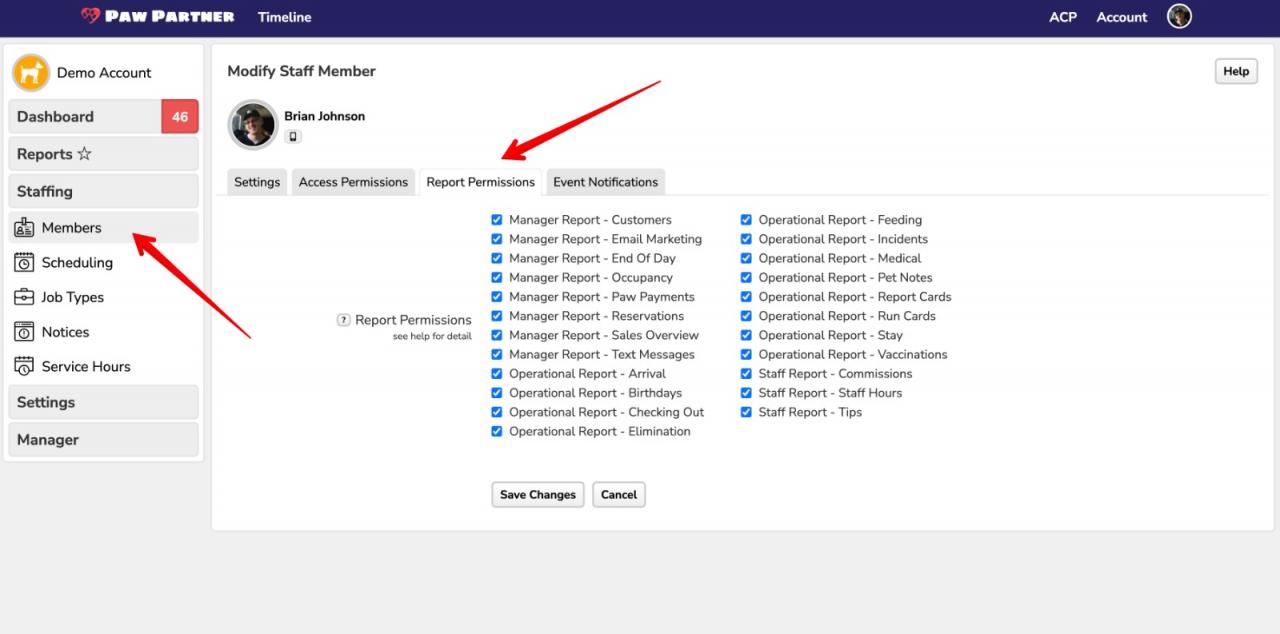
Along with the restructuring of the reports area we have added the ability for you to select which reports you would like each employee to have access to.
We have had many customers asking for the ability for non-manager employees to have access to the end of day report, occupancy report etc. but not have full access to all reports and the system. These new permission settings allow you to selectively choose which reports your employees can see and which they will not have access to.
When creating a new employee, the system will walk you through the different permissions and access levels where you can choose these settings. For any of your existing staff that you would like to edit, first click on the "Staffing" section in the left hand menu, then click "Members" and search for the staff member that you would like to change the settings on. Next click the "..." menu next to their name and click "Modify". From here you will see a few tabs and clicking "Report Permissions" will allow you to select which reports you would like this staff member to have access to.
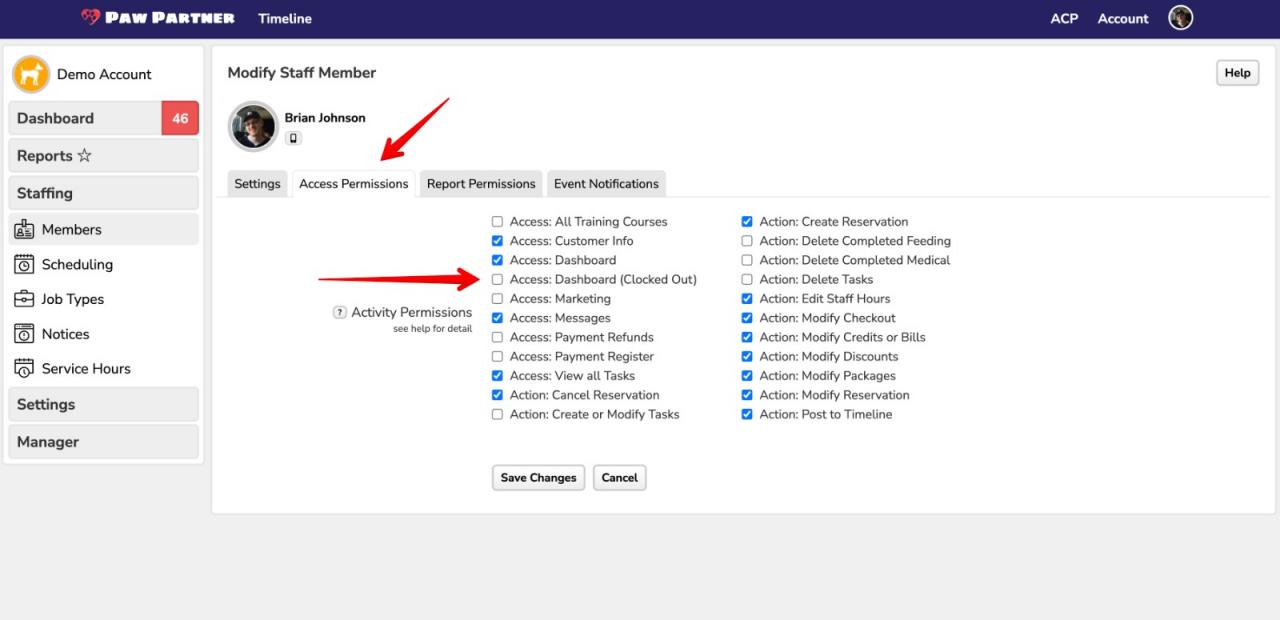
We have also added the ability for you to allow your general staff to access the dashboard and your business account without them having to clock into the system.
By default the settings make staff clock in to access your business unless the staff permission level is Owner/Manager. With this new setting, if you would like to enable it, general staff will be able to access your Dashboard by logging in - and will not have to clock in - to access Paw Partner.
To enable this setting for your existing staff the process is very similar to the report access steps above: first click on the "Staffing" section in the left hand menu, then click "Members" and search for the staff member that you would like to change the settings on. Next click the "..." menu next to their name and click "Modify". From here you will see a few tabs and clicking "Access Permissions" will allow you to click the " Access: Dashboard (Clocked Out)" check box which will enable this setting for this staff member.
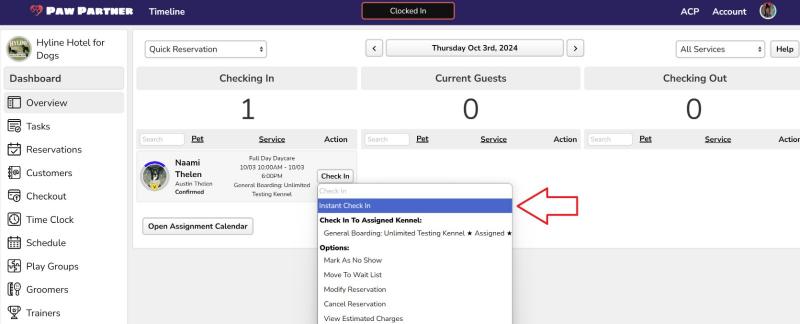
A few months ago we released the ability for you to check in multiple pets from the same family to make the check in process a lot faster for our businesses. After receiving great feedback and multiple requests to make the daycare check in process faster we have released a new feature to make daycare check ins much faster as well! When you have a daycare pet reservation and you click the "check in" drop down from the "Checking In" column, you will now see the option for "Instant Check In". This one click check in will bypass all of the feeding, medical, customer items etc. and will automatically move the pet over to the "Current Customers" as a checked in guest. Note if you want to enter food, meds etc for the pet you will want to follow the current check in process by checking them into their space of daycare and you will follow the same flow as now.
As always a big thank you to all of our amazing customers who provide invaluable feedback and suggestions. We have some bigger updates that we are working on and will provide more updates soon!
If you have any questions or see any issues with the release please don't hesitate to contact us at Support@pawpartner.com
We have a bunch of new updates we have been working on for a while that we are excited to get out to you! As always, thank you to all of our amazing customers who provide feedback and feature requests! We get many fantastic requests a day - if we have not built your feature request yet, don't worry - we are still working on more updates! If you have questions about this release or would like to make any suggestions, please reach out to us at support@pawpartner.com.
We have updated our feeding and medical reports so you can add notes to a feeding or medication entry. You can also easily update feeding and medical instructions directly from the feeding and medical report! We have also added "Not Needed" as a medical entry for "As Needed" medications that are not needed at this time.

We have added a new alert for when you are trying to send a message to a customer with no email address. If you attempt to message a customer with no email address you will now see the warning message below. This is to let you know that the customer has a missing or bouncing email on file - you may want to call the customer if you have important information to relay to them.

We have added a "Status" selector to both the groomer and trainer "Today" screen. This will allow you to filter and see all reservations from a specific status. We have also added the ability to view previously uploaded grooming images in the groomer "Today" screen.

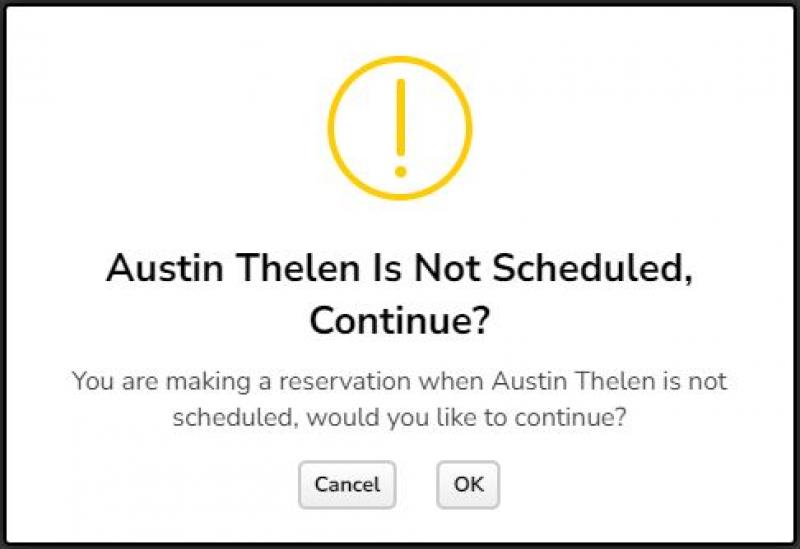
This was added for situations when Staff are making a reservation for a groomer or trainer through the grooming/training calendar. If you are adding a reservation outside the normal scheduled hours for the groomer/trainer you will now see this message alerting the staff to the situation.
If you have our Twilio text messaging integration, you have the option to choose what actions will send an automated message to your customers. To access this area click "Settings" -> "Messaging" -> "Boarding/Daycare/Grooming/Training". You can now select "Waitlist Reservation is Confirmed". Since you have 700 messages included with your standard plan, you now have the ability to not text all confirmed reservations and can now ONLY send waitlist reservations which gets confirmed if you prefer that option.

We have added the ability for you to work on a report card and then at a later time update the customer once you are finished. When you are ready to send it to the customer just select "Notify customer" and then "Update".

We are really excited to add these updates for our add ons. To change any of your existing add ons with these new options, click "Settings" -> "Pricing" -> "Add Ons" then find the Add On you would like to edit and click "..." -> "Modify".
You can now limit add ons to only be booked specific days of the week. This is very useful if you have grooming add ons for a boarding reservation but your groomer only works specific days of the week.
You can also now limit the frequency of the add ons to whatever frequency you would like. This would be helpful if you only want exit baths scheduled on the "last day".
You can also now limit the max amount of this add on to be booked on one day. If you only want to allow a customer to book 2 walks a day, you can now do that!

Today we are updating a new release that we have been working on for a while. We are excited to get some of these new features out! Thank you to everyone for your feedback and we are continually working on more features everyday!
Previously you were able to block a customer from making a reservation with you. We have added the ability for you to also block customers from messaging you. When they are blocked, they will not be alerted that they are blocked, but the "Send Message" icon will be hidden from their home screen which will prevent them from messaging you. To block a customer from messaging you access the owner card by clicking on the profile icon of the customer. In the "Info" tab scroll to the bottom and you will see a "Block Message" check box. Once selected and saved, that will block the customer from sending you messages.

We have added a few new staff permission settings. We added the ability for business owners to restrict their managers from modifying their own timeclock hours. We have also added the ability to restrict staff from changing anything at checkout. This will prevent staff from adding discounts that owners would prefer them not to add. To enable/modify these settings, click "Staffing" then "Members" then "..." next to the staff member you would like to change the settings for and select which permission settings you would like, and then save changes.
We have added the ability for you to accept certain grooming/training appointments for certain hard start times. This is particularly useful for groomers who want to take certain services at specific times. For example "I want to take only small dogs at 930 AM" or "I want to take 4 nail trim appointments at 2 PM". The set up for this can be complicated based on your businesses' settings. Please contact Support@pawpartner.com and we can make sure that you are set up according top your preferences!
When you click "No Show" when a customer does not show up for a reservation, a modal window will appear and you are able to deduct a package credit from their package if they have one.

You are now able to restrict selling packages in the "Packages" icon in your customers "Home" page. This will only present the package to be purchased when the customer is actually making a reservation. This is particularly useful for trainers who don't want customers buying group training class packages unless they are making a reservation for the class. To enable this click "Settings" then click "Pricing" then "Packages" then find the package you want to modify and click "..." then "Modify". From here if you select "Reservation Create Only", this will enable this restriction and customers will no longer be able to buy this package if they aren't in the process of making a reservation.

We have added the ability for you to add conversion tracking for your Facebook and Google ads. You will need to have your " Google Analytics ID" and/or your "Meta Pixel ID". Then go to "Settings" then "Integration" and scroll to the bottom of the screen and input those into the correct area. This will help you know how many of your ads are successful with these ad companies. This will embed your ID into your booking link that your customers create accounts on/login to.
You now have the ability to choose which automated notifications your customers will receive. If you click "Settings" then "Messaging" you will see options for "Email Options", if you have text messaging enabled "Text Message Options" and if you have our custom branded app "Push Alert Notifications". Clicking into those tabs you will see sub tabs for all of your automated messages that go out to customers. You can choose which ones will get sent out to customers by unselecting any that you do not want to be sent out to customers.

From time to time, trainers may need to move a class to a different day. This can make the classes seem out of order if you modify class 2 to a new date at the end of the course. We have added the ability to quickly reorder the class names to align correctly. Click "Trainers" then the trainer you are working with, then click "Manage Courses" and click into the course you are working with. If you have a class that is out of order because you modified one class to a later time you can now select all classes with the check boxes and click "Rename Checked". This will bring up a modal window with all classes selected. At the top of the screen you will see a new button that will auto reorder the classes for you. Once you save changes you will have them back to the correct order.

When you go to clone a group training class the system will now bring up a new window that will ask you to choose a new start date. Once selected it will automatically use the same repeating options as the course you are cloning from. This means if you are cloning a 6 week course, you will be asked a new start date and the system will create a 6 week course with the same parameters as the course you are cloning from (weekly, biweekly etc.).

We have added the ability for you to move a customer from one group class to another. When you click on the "..." next to the group class reservation for a customer you will see "Move Reservation". You will want to use this if you ONLY want to move one class from the course. After selecting this you will see a modal window where you can select another class to move it to. Selecting "Move Here" will send that one class to the new course.

If you want to move ALL of a customers classes from one course to another, click "..." next to one of the customers reservations and select "Switch Course". This will bring up a list of available courses. You can select which course with the course selector at the top of the window. NOTE: if you are switching to another course that has more or less classes than the customer has reservations for in the original course, the system will make the customer have the same number of classes as the course you are switching to. For example: a customer is in a 6 week class and has already gone to 1 class and you are switching to another 6 week class, the system will automatically add one class so the customer has 6 classes for the new course they are switching to. You can easily delete any of the classes you are switching to but by default the system will match the customers reservations to the course you are switching to. NOTE: All packages credits and reservation deposits will be transferred with the customer. IF the customer has reservation deposits for 6 classes and you move them to a course with only 5 classes, then one classes' deposit will be converted to user credit. IF you have reservation deposits for 5 classes and you switch a customer to a course with 6 classes in it, the customer will only have 5 reservation deposits and will need to pay one more deposit.

Based on many businesses wanting a cash change calculator, we have added that to this release. When you check out via "Cash" you will see a new modal asking you to input the amount of cash received. If you input an amount higher than the amount due, it will automatically calculate how much you should return to the customer. If the customer pays with the exact amount due you will just see "$0.00" as change. Either way pressing "Continue" will complete the checkout.

Many of our businesses require their customers to have their profile pictures so they know who to release the pets to. We have added the ability for you to upload your customer's profile picture for them. Just click into the owner card to access. Then in the profile picture you will see "Change Image" where you will be able to upload a picture directly into their profile for your business.

As always we are ever grateful to have the best customers we could ever hope for. Thank you for all of the feedback that helps us make all of these features possible. See the "Updates" section in your Paw Partner account to see a full list of the new features released today. We will continue to work on all of the features you have requested.
If you have any questions or see anything off from today's release please contact us at Support@pawpartner.com
Thank you!
Paw Partner Family
With todays release we have created many new triggers for staff to be notified when actions are done in Paw Partner. To access and set these new notification settings please click "Staffing" -> "Members" -> "..." next to the staff member you want to edit, then click "modify". From here you can easily select which actions you want the staff member to be notified about. You can also select how the staff should be notified by email, push notification If your business has our custom branded app, or text if you have our text integration set up. Note: If you don't have our text integration or our custom branded app then email notification will be the way your staff can be notified. You can also select to notify the staff "only when clocked in" or "Always." If you have any actions you would like to add please let us know at support@pawpartner.com

With this new update we have created the ability to stop customers from submitting reservations too close to the reservation start time or too far into the future. For example you can now stop customers from submitting reservations within 24 hours of the reservation start time, or you can prevent them from making a reservation more than 6 months in the future. Of course staff can override these settings. To update these settings you can click "Settings" -> "Services" and find the service you want to add this block for. Next to that service click "..." then "Modify". At the bottom of the settings for that service, you will see "Block Creating" and "Allow Creating" as options to select. If you select your preference and save changes it will now prevent customers from submitting reservations based on your preference. If you need help modifying your services, we are here to help! Just reach out to us at support@pawpartner.com

We have just released a new future revenue forecast report. This report will show you your expected total income for a future date range. This will show the expected revenue based on what is currently reserved with your business. Note that this report does not include deposits, customer credit, or discounts. To access this report click "Manager" -> "Reports" -> "Sales" -> "Revenue Forecast". You can select a future date range and it will display your gross revenue based on your reservations. The default is to "all" service types but you can tab through each service type as well:

Thank you to all of our customers who have submitted feature requests to our team. You can submit any feature request to us at support@pawpartner.com. We decide our next features to build based off of how many votes a feature gets to build, and the utility of that feature to our broad customer base.
We have finished building and are testing some great new features that will be released in the coming weeks:
* Requiring saved credit cards on file for making a reservation.
* Requiring a customer to have or buy package credits to reserve a certain service
* Requiring a customer to have or buy a membership to reserve a service.
* Ability for customers who have package credits to bypass having to leave a deposit for a service
* Training updates.
Thank you to all of our amazing customers!
Paw Partner
One of our most requested features has been for prerequisites. We are very excited to release this new feature! You are now able to create required services to be completed before a customer is allowed to book a certain service. This is particularly useful for boarding and daycares that require assessments to be completed or for trainers who would like training courses to be completed before a customer moves onto the next level.
To set new prerequisites, you can do so by clicking "Settings" -> "Services" then click "prerequisites" in the top left corner of the screen. From there you can create a new prerequisite and select from many options. Please see this video for how to set up an "Assessment" prerequisite for boarding or daycare:
You can also set up prerequisites for your group classes as a trainer. Here is a video of how to set up prerequisites for training classes that must be completed before the next level is reserved:
When you set up prerequisites it will limit your desired service from being reserved by them until they have met the requirements. We do allow staff to override prerequisites, but do label them when the prerequisites have not been met for staff. Here is a video of what your customers will see when they are booking an assessment with a prerequisite set up:
Many businesses will have groups of customers who they would like to add previously pass requirements and allow them to skip the set up prerequisite. You are able to update a pet to have "passed" the prerequisite in two ways. First, you can update them directly in the pet card by clicking the pet picture anywhere in Paw Partner. In the opened pet card, you can select in the top right options menu the drop down selection of "Prereq config" and this will pull up a window that will allow you to set up a pass for that pet. The second way for you to add a pet to "bypass" the prerequisite is a new tool. Click "manager" -> "tools" -> "reservation prerequisites". In here you can easily search for pets and set up bypasses for them to skip the prerequisite. See this video on how to do this:
We have also released a new optional requirement for pets to be up to date on Vaccines, Agreements, or Questions to be completed before the pet can be checked in. To be clear: there are no overrides or exceptions on this feature, so this tool would best be used by businesses who absolutely require these to be complete before the customer can check in. If the customer is missing these the system will prevent your staff from checking them in until the missing information is inputted. The default for this is for the requirements to be off so this will only be enabled if you go an enable it. Just remember if you enable it, the system will fully block staff from checking in a pet if it has missing information. To enable this feature click "Settings" -> "Business" you will see "require at check in" and you can select which of the check boxes you want to absolutely require before the pet is checked in. Here is a photo of where to enable this feature:

If this feature is not enabled, Paw Partner will continue working exactly as it was before. Your staff will be alerted with a modal window asking for them to confirm they want to bypass the alerts that are presented to them.
* Marketing and CRM. We are currently in an open BETA testing of our new email marketing and CRM. We have had some great feedback from our businesses and are still working on updates as we finalize all of the features.
* Other training roster updates
*Additional reporting updates
We are excited to release some features we have been working on over the past few months. These updates range in a wide area of the platform and should help with business operations!
We now have the ability to block pet owners from making reservations. To do this you can access the "Owner Card" by clicking on the owner icon in the customer browser or within the pet card. In the "info" tab of the owner card if you scroll to the bottom, you can now select the check box that says "Block Reservations", then click "Save". Note this this will block the owner from submitting any of their own reservations. They can still message the business and see past reservations. Your staff can also override but there are numerous flags and pop up windows warning staff about the owner being blocked. See this video for how to use this new feature!
We also made a new block pet feature similar to the block owner feature above. This feature is useful if a pet fails an assessment or if you do not want to book a pet for any future reservations but the owner has dogs you want to still be able to make reservations for. To block a pet from making future reservations, click the pet icon to access the pet card. Click the "info" tab and scroll to the bottom and check the "Block Reservations" checkbox. When a customer goes to make a reservation their pet will be grayed out and unelectable for them to make a reservation. Your staff can override this but will have numerous flags and windows alerting them they are making a reservation for a blocked pet. See this video for how to use this new feature!
In both the pet and owner card we have replaced the icons in the top right corner to a drop down select with writing. This makes it more clear and allows us to add more actions. In the owner card (accessed by clicking the owner icon) we added "Send Message" in that drop down menu. This allows you to send messages to the owner in many more places throughout the platform. In the pet card we added a "Info" tab. You can now easily update basic pet info directly in the pet card instead of having to click into the pet profile. This will save a lot of time when making simple updates to the pet. See this video for how to use this new feature!
From some great feedback from our pet trainers we have added the ability to make multiple classes of a course at one time instead of individually. You can access this by going to the trainer dashboard and clicking "manage courses". If you click "Add New Start Date". When entering in your first class information, when you scroll down you will now see "Optional: Create Multiple Class Dates". When you click this you can enter your repeating options and it will make all of those classes at one time instead of making each individually. See this video for how to use this new feature!
We have added the ability to clone an existing course by clicking the clone icon where the course appears in the "Manage Courses" area of the trainer dashboard. Now when you clone a course it will show a list of current customers in that course. You can select some or all of them to add to the new cloned course. This makes it much faster and easier for classes that are on going and the same customers continue taking the same course. See this video for how to use this new feature!
Along with these new features we have been working on some other big features over the last couple months and they are almost ready. Here are some of the additional new features we have built and are testing before we get them released out.
As always thank you wall for your continued feedback and support! If you have any questions about this release feel free to contact us at support@pawpartner.com
We have been working on our email marking and Customer Relations Management update for the past couple months. Those features are on the finishing stages of being tested and updated. We are expecting to release that big release in the next couple of weeks. This release has some significant changes that have been requested for a long time and they were developed in tandem with our marketing CRM changes.
With our release today we have 2 changes in our messaging update:
In the messaging browser you can now mark messages "Unread" by either clicking the check boxes in the main messaging screen or within the individual message view as well.
Within the messaging system we have separated out staff messages and customer messages. Staff messages are any messages sent to any staff within your company. When creating a staff message you can now send a message to "All Staff", to a staff Job Type, or to an individual staff member. You will see customer and staff inbox and sent separated out to keep those easier to manage. See the picture below for reference.

With this new update we added a new icon in the owner card. To access the owner card click on the owner icon. In the top right of the owner card you will see a new icon that is an envelope and is the "notification history" icon. Clicking this will take you to the customers notification history where you can see any emails, text messages, or push notifications that has been sent to the customer. You can also access this in the customer list by clicking "..." next to the customer and click "notification history". See the photos below for reference.


We have added some new durations for package expirations. We have added 1 week, 2 weeks, 3 weeks, and 36 month. To access click "settings" then "pricing" then "packages". See picture below for reference.

When we created Paw Partner we designed it so that we would have 3 areas that businesses on our platform could help the pet community out and share some information. In the past few months we have had some businesses use this community sharing information in a way that does not meet our standards of how businesses should interact on the platform. This has necessitated us to make all information non sharable between businesses. The three areas that businesses used to be able to share information with other businesses that are now changed is the pet profile pictures, pet vaccinations, and pet incidents. All three of these areas are now completely separate per business and there is now no sharing of information between businesses unless your company has multiple locations. See the picture below for reference of the three areas that are now separated.

As always, we really appreciate all of the feedback and continually have features we are working on, so if you have submitted feature requests we are working through our list!
As part of this exciting new release we have added a new 'Homework' feature. You can now send your clients Homework for private training lessons or in group classes. For private lessons, you can send them homework directly in the "Today" tab from the training dashboard. For group classes, you can send your entire class homework or individual owners homework directly from the "Today" tab in the trainer's dashboard or directly within the new "Roster" section of a group class.
When a customer receives homework, they will have a new "Homework" icon pop up in their home screen options. They can access new homework or any homework for previous lessons/classes they have taken in the past. See the video below for details on how to use this new feature!
We have been developing this feature for a long time and we are really excited to release it! You can now access training rosters for any group course you teach. You can access all of your rosters in the "Roster" tab in the trainer's dashboard or by clicking the "Roster" button in the "Today" tab next to the course you want to see the roster for.
Within the roster you can easily message the whole class, send homework to the class, take course notes/lesson plans, view and update notes about individual pets, group check in pets, individually check pets in, group checkout pets, individually check out pets, and more. See the video below for details of how our rosters work.
A couple weeks ago we released the ability to create custom branded apps for your business! We have had a big response to people signing up for those! We have designed a way for Paw Partner to automatically create a custom QR code for you to use in marketing materials. The QR code will take your customers to either the Apple App store or Google Playstore to download your new custom branded app. We also made a simple marketing flyer if you don't want to create one yourself. To access these materials go to "Settings" -> "Integration" -> "Mobile App Flyer& QR Code". See the video below for more details.
In today's release, we have updated and improved many new features. This blog will cover our three biggest updates. Stay tuned on our next update coming soon with our new training roster and homework updates. This will be released when it is finished being tested!
With this new update you are now able to send multiple messages at the same time. You can do this in two areas: the Arrival Report, and in the Reservation Browser. We are working on developing a more in depth "Email Marketing" feature that will be released when finished. These messaging features are integrated with our messaging platform and can use templates and attachments but not branded marketing which is what we are working on adding.
Messaging in this report is particularly useful when you want to contact all of your customers scheduled to come in on a certain day. An example would be "my groomer is sick and I need to message all of my grooming customers tomorrow to let them know they need to be rescheduled".
To access this report go to the overview screen and click "Reports" -> "Arrival Report"
You can select which date you want to see in the date selector at the top of the page. You can use the red toggle button on the top right corner of the screen to switch between services scheduled to arrive on that day. See the video below for detailed instructions of how to send messages within this report:
Messaging within the Reservation Browser is possible by going to the overview screen and clicking "Reservations". Within the Reservation Browser you can sort and filter by clicking the tabs or the sorting headers on the op of the columns. See video below for detailed instructions on how to send multiple messages in the Reservation Browser:
We added a new report in our "Sales Report" section. This can be accessed by clicking "Manager" -> "Reports"-> "Sales" -> "Taxable Income". This report will allow you to select a date range and will show you all of your taxable income for that period and how much tax was collected for that date range. Your collected tax amount will match your total tax collected in the Sales and Income Overview report in the top summary section. For detailed information regarding the new Taxable Income Report see the video below:
We have added some new settings regarding prompting your customers for tips when they are paying a deposit or prepaying for a reservation. You can update these preferences by clicking "Settings" -> "Payment". See the video below for detailed instructions on how to use these new setting updates:
A big thank you to all of our customers for the continuous feedback. We have many new features we are currently working on. We slightly changed the way we release bug fixes and small new features allowing us to release those to you faster.
Please let us know if you have any questions or need anything at all!
- Paw Partner Support
We are beyond excited to be releasing our new custom branded mobile apps. This is a feature that we have been developing for months and it is finally available for release- you can now have your very own mobile app in the Apple App store or Google Play Store! Signing up for the custom mobile app will give your staff and customers a complete branded experience on the desktop as well. Read below for more information about this exciting new release!
Do you want your customers to have the most branded experience with the most features in the industry? Check out our new branded apps! When you sign up for a branded app, we will build and release an Apple and Android app in the App stores. Your branded mobile app will have the same full set of features but will have branding exclusive to your business and an app with your business' name on it!


With your custom branded app, your customers will have the same experience and login account information as with our main Paw Partner app, but will only be able to interact with your business! Customers will have the same options to make reservations, buy packages, pay invoices, sign up with memberships as with your current Paw Partner account.

When your customers interact with your business through their desktop or mobile app, they will also only see your business' posts and pictures in their 'timeline'.

When you sign up for our branded app, your customers will have all of our premium app features for free! Your business will also have the option to turn off these features if you choose. For your daycare or boarding services, if your business chooses to allow, your customers will be able to set alerts for our mobile app to alert them when you are filling up for a specific date or holiday so they can get a reminder to make a reservation for the holidays before you fill up!

Another premium feature your customers will get included with your branded app if you choose will be that they will get a occupancy color bar showing how close you are to being fully booked. You have the ability to limit these premium features for your customers if you choose!

With our new Branded experience, your staff will have all of the same features and logins as they do with our Paw Partner login, but they will also have the branded experience!

Your Staff will have all the of features from our industry leading mobile app including task management, messaging, time clock, and more!

We have created a demo custom branded mobile app in the app store. Just search for "The Pet Dojo" in either the Apple App Store or the Google Play Store. Download the app and log in with your current Paw Partner credentials and you will be able to see what your customers will experience with the new Branded App!

Our industry has a couple companies who have attempted to make "Custom" apps. Our new branded app is a complete game-changer for the industry. We brought all the features of Paw Partner and made it available in your Branded app. Instead of only having features on the customer side, our branded app has 100% of the features that you can use on the computer also available in the mobile app. The limited custom apps in our industry charge up to a thousand dollars to build your app and hundreds of dollars per month. We want our customers to have every tool available to grow and boost their business.
To build your new Custom Branded App there is a $300.00 app-building fee.
When signing up for the Branded App there is a $99.99 monthly maintenance fee.
This branded service is an add on to our general Paw Partner subscription and is added to your current or new subscription with Paw Partner.
Speak with our team today, we would love to show you the best Custom Branded App in the industry!
Message Support@pawpartner.com to speak with our team!